Making orgonite at home is simpler than most people expect. You don’t need specialist equipment or advanced skills — just a few basic materials, a mould, and some patience. This guide walks you through everything you need to get started.
What You Need
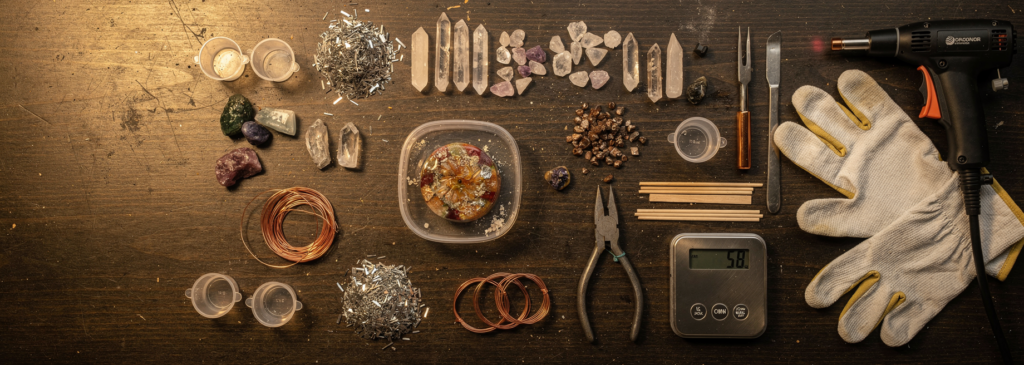
Metal shavings: Aluminium is the most common and easiest to source. Steel and copper are also used. You can find metal shavings at metalworking suppliers, online marketplaces, or by asking at a local machine shop.
Resin: Polyester resin is the most widely used for orgonite — it is inexpensive, widely available and cures hard. Epoxy resin is a cleaner alternative with less odour, though it is more expensive.
Crystals: Clear quartz is the standard choice. A small point or tumbled stone works well. You can add additional crystals based on your intention.
Moulds: Silicone moulds are ideal — flexible, reusable and easy to release. Muffin tins work well for tower busters. Pyramid moulds are popular for decorative pieces.
Step by Step Instructions
Step 1 — Prepare your workspace. Resin fumes can be strong. Work in a well-ventilated area and wear gloves and eye protection. Cover your work surface with newspaper or plastic sheeting.
Step 2 — Prepare your mould. Place your crystal in the bottom of the mould — point facing up if using a quartz point. This will end up at the top of the finished piece.
Step 3 — Add metal shavings. Fill the mould roughly halfway with metal shavings, loosely packed.
Step 4 — Mix your resin. Follow the manufacturer’s instructions for your specific resin. For polyester resin, add the catalyst drops and stir thoroughly for two to three minutes.
Step 5 — Pour the resin. Pour the mixed resin slowly over the metal shavings until the mould is full. Tap the mould gently to release air bubbles.
Step 6 — Cure. Leave the mould undisturbed for the time specified by your resin manufacturer — typically four to eight hours for polyester resin, longer for epoxy.
Step 7 — Demould. Once fully cured, flex the silicone mould to release the orgonite piece. Sand any rough edges if needed.
Tips for Better Results
Keep your metal to resin ratio at roughly 50/50 by volume. Too much resin and the orgonite loses effectiveness — the metal matrix needs to be dense enough to do its work.
Add your crystal with intention. Many practitioners hold the crystal before adding it to the mould, setting a clear intention for what the piece will be used for.
Start simple. Your first pieces don’t need to be perfect. Tower busters are the ideal starting point — small, fast to make, and a great way to get comfortable with the process before moving on to more complex shapes.
Experiment with crystals. Once you are comfortable with the basic formula, start exploring crystal combinations. Black tourmaline for protection, amethyst for calm, shungite for EMF environments.
Where to Learn More
Read our guide to Crystals in Orgonite for advice on mineral selection, or visit our Tower Busters article for more on the simplest orgonite form. If you prefer to buy rather than make, the Orgonite Shop Guide has independent recommendations for quality pieces.